For those of you who’ve been waiting to apply Microsoft’s October patches, the coast looks reasonably clear. We have a few outstanding problems with bugs in the latest round of patches — Office 365 Click-to-Run customers need to take special note — but by and large, the October updates are now ready for prime time.
The patching landscape now is quite different from how it appeared last month, thanks to the patchocalypse — Microsoft’s way of combining patches into indivisible groups. If you’re not yet familiar with the approach, take a look at my overview of the new approach.
In essence, you need to take a stand. Your two patching choices are the following:
Group A: Those willing to take all of Microsoft’s new telemetry systems, along with potentially useful nonsecurity updates.
Group B: Those who don’t want more snooping than absolutely necessary and don’t care about improvements like daylight saving time zone changes, but want to keep applying security patches.
If you fall into Group A and you’ve set Automatic Update to “Check for updates but let me choose whether to download and install them” or “Never check for updates (not recommended),” it’s time to release the Kraken. Here’s how to proceed.
Group A, Step 1: In Windows 8.1’s desktop mode, hold down the Windows key and press X, then choose Control Panel. In Windows 7, using an administrator-level account, click Start, Control Panel. In both cases, click System and Security. Under Windows Update, click the “Turn automatic updating on or off” link.
Group A, Step 2: Check the box marked “Give me recommended updates the same way I receive important updates” and click OK.
Group A, Step 3: Back in the System and Security part of Control Panel, click Check for updates. If you get some sort of nonsense about “Check for updates for your computer,” once again, click Check for updates.
Group A, Step 4: Wait. If you have the latest Win7 update scan speedup applied, it’ll take a few minutes. If you don’t, it may take hours. (Detailed instructions coming on InfoWorld.)
Group A, Step 5: Don’t go looking for trouble. If you see a notice that optional updates are available, ignore the notice. All of the updates you need will be preselected. If there aren’t any important updates that you need, nothing will be selected.
In particular, if you go poking around, you’ll probably see something called a “Preview of Monthly Quality Rollup for Windows 7″or Win 8.1. You don’t want it. The “Preview” is, in fact, a beta version of the rollup you can expect next month — and it isn’t baked yet. That’s why Microsoft calls it a “Preview.” I have no idea why the company put it in the Windows Update collection. Normal people should never go near the “Previews.”
No, you don’t want to check any unchecked patches.
Group A, Step 6: If you see a button that says “Install updates,” click it. You may need to reboot; Windows Update will step you through it.
Group A, Step 7: Get Automatic updating turned off, and wait for next month: Click the “Change Settings” link on the left. (If you’re back on the desktop, click Start, Control Panel, System and Security. Under Windows Update, click the “Turn automatic updating on or off” link.) Verify that you have Important Updates set to “Never check for updates (not recommended)” and click OK.
Those steps should get your Windows 7 machine fully patched, with all that Microsoft has to offer, without installing anything weird. You’ll be left ready for next month’s batch — and set up to wait until the unwashed masses have finished beta testing the release.
Group B is an entirely different kettle of fish. Performing a Group B update is a tad more difficult than a Group A update, because you want to go straight for the security patches (plus Office patches, .Net patches, and anything odd that gets tossed into the mix) while avoiding the Monthly rollups (now called Security Monthly Quality Rollups), which include both security and nonsecurity patches.
If you choose to go the Group B route, here’s how to get patched:
Group B, Step 1: Find this month’s Security-only patch (now called a Security Only Quality Update) for your computer. The easiest way I know to locate the file ignores the Microsoft Update Catalog and instead goes through the associated KB article.
For Windows 7 and Server 2008 R2, go to the Win7 update history page.
For Windows 8.1 and Server 2012 R2, go to the Win 8.1 update history page.
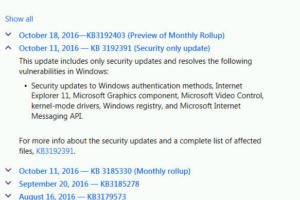
In either case, you see a list of updates like that shown in this screenshot:

You’re looking for the latest “Security only update” — in the screenshot, that’s KB 3192391, released on Oct. 11. Once you’ve found it, click on the down arrow next to the date, then click on the link to the KB article, in this case, the link to KB 3192391.
Group B, Step 2: Once you’re in the KB article, scroll down to the section marked “How to obtain and install the update.” Choose the correct package — note that the “Security Only Quality Update for Windows 7” is for 32-bit systems and “Security Only Quality Update for Windows 7 for x64-based Systems” is for 64-bit systems. Click the “Download the package now” link below the correct version of Windows.
Group B, Step 3: Scroll below the advertising and click on the red Download Now box. Run the downloaded MSU file. Windows will take a while to install the update, then prompt you to reboot the computer. Click Restart Now.
That installs the month’s security patches. But there’s more — .Net, Office, and likely some miscellaneous.
Group B, Step 4: You need to run Windows Update to catch any patches that you need other than the patches for Win7 itself. My recommendation is that you avoid Microsoft’s “recommended” patches — all too frequently they include changes you may not want (for example, KB 2952664). To make sure you don’t get recommended updates preselected, click Start, Control Panel, System and Security. Under Windows Update, click the “Turn automatic updating on or off” link. Uncheck the box marked “Give me recommended updates the same way I receive important updates” and click OK.
Group A, Step 5: Back in the System and Security part of Control Panel, click Check for updates. If you get some sort of nonsense about “Check for updates for your computer,” once again, click Check for updates.
Group B, Step 6: Here’s where you need to burn a few gray cells. Chances are good you’ll have one or more “important” updates listed and several “optional.” Start by clicking the link to the important updates.
Group B, Step 7. Under “important” updates, you’ll likely find “Security and Quality Rollup for .Net Framework” — which you probably want, as well as security patches for Office. Keep those checked.
Most important: You shouldn’t see an update for Security Monthly Quality Rollup, but if you do, uncheck the box next to the patch. I haven’t seen that patch appear after installing the Security-only update, but ya never know. If you install the Security Monthly Quality Rollup, it will propel you into Group A.
Look through the Optional updates if you like, but remember that those are the patches you’re largely rejecting because you’re in Group B.
Group B, Step 8: Click OK, then click Install Updates. Reboot, and you’re done — although it wouldn’t hurt to make sure that Automatic update remains set at “Never check for updates (not recommended).”
With that, you’re all updated and ready to go. Or, more accurately, you’re ready to wait for next month’s updates.
[Source:-Infoworld]


