Windows 10 has already been installed on well over 350 million machines according to Microsoft. Here we’ll explain how you can upgrade your PC or laptop, as well as how to do a clean install. Be sure to back up photos and anything else you don’t want to lose before starting the upgrade. See also: how to upgrade from Windows XP to Windows 10.
In order to help you navigate this page use the links to jump to the section you need:
- How to get Windows 10 now: download and upgrade from Windows 7 or 8.1
- How to get Windows 10 now: Clean install
- How to fix flashing screen after Windows 10 installation
- How to fix black screen boot problems after Windows 10 installation
- How to fix black screen boot problems: How to prevent the black screen problem after Windows 10 installation
- How to fix black screen boot problems: The black screen problem after restarting your PC
Microsoft is making it more and more difficult not to upgrade to Windows 10 and, as we reported in our How to stay on Windows 7 or 8 forever guide, Microsoft experimented with making the upgrade an ‘Recommended’ one for Windows 7 and 8.1 users. This means it will download the new OS and install it – with your permission.
Contents
- 1 Podcast discussion: Free upgrade ends for Windows 10
- 2 How to get Windows 10 now: download and upgrade from Windows 7 or 8.1
- 3 How to get Windows 10 now: Clean install
- 4 How to fix flashing screen after Windows 10 installation
- 5 How to fix black screen boot problems after Windows 10 installation
- 6 How to fix black screen boot problems: How to prevent the black screen problem after Windows 10 installation
- 7 How to fix black screen boot problems: The black screen problem after restarting your PC
Podcast discussion: Free upgrade ends for Windows 10
How to get Windows 10 now: download and upgrade from Windows 7 or 8.1
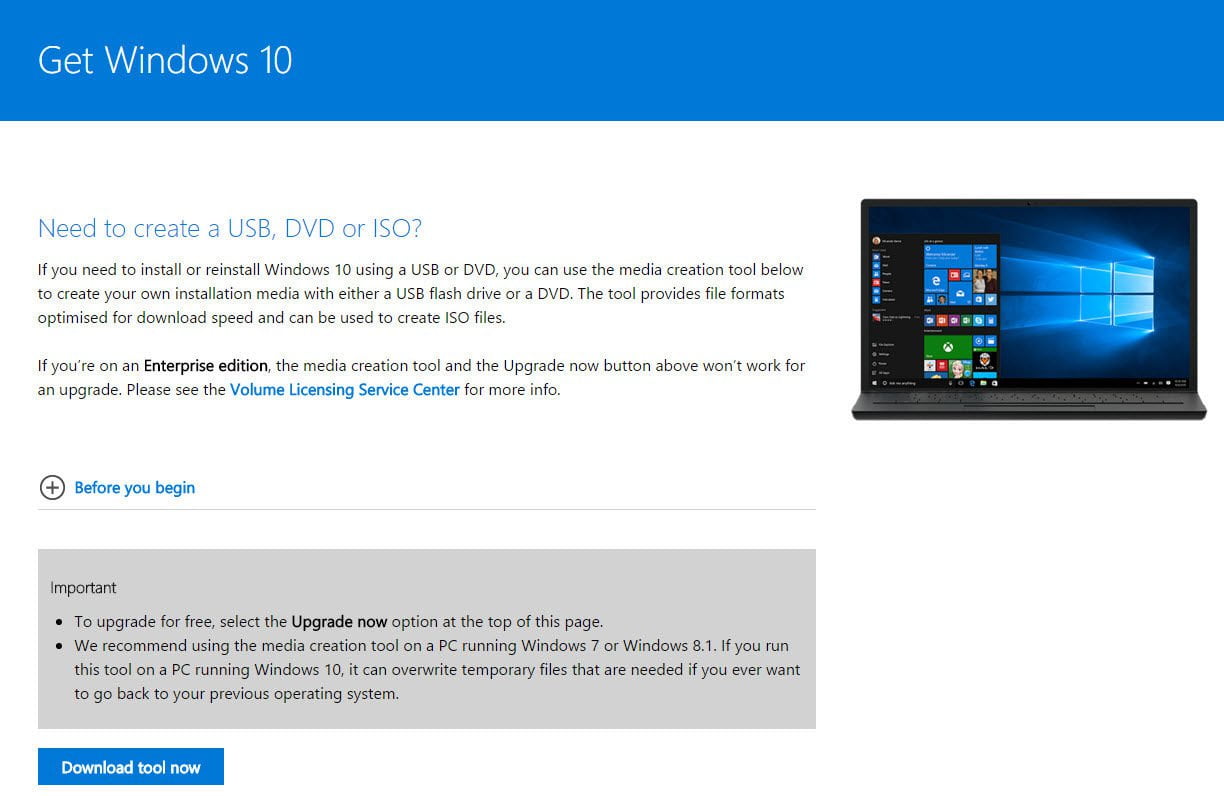
Step 1: Head to Microsoft’s Windows 10 download page and click on the Download tool now button. There’s no need to save the file – just choose the Run option.

Step 2: You will see two options: Upgrade now, or create installation media. Assuming you’re trying to upgrade the PC you’re running the tool on, choose Upgrade this PC now. The reason for this is that you can’t do a clean install straight away as part of the free update. You can jump to the Clean install section of this guide.

Step 3: Now Windows 10 will start downloading from scratch and will take between 20 minutes and an hour or more depending on the speed of your broadband.

Step 3: If you would rather create a bootable USB or DVD to install Windows 10 on another computer, or multiple PCs, choose that option. This is a new and easier way to install Windows than dealing with ISO images, as the download tool is an all-in-one utility that will do everything for you. All you need is at least a 4GB USB drive (or single-layer writable DVD). It can also convert the downloaded files to an ISO if that’s what you want. You can choose the language, and even to create a bootable drive or disc with both 32-bit and 64-bit versions. What’s important is that you choose the right Edition. You can see which version your computer is eligible for in Will my PC get Windows 10?

Step 4: Accept the licence terms when prompted, and the installer will then check your PC for compatibility with Windows 10, that it has enough free space and will download updates. Youwill not need an activation key for Windows 10 if you are upgrading from an eligible version of Windows 7 or 8.1.
Step 5: When prompted, click to install Windows 10 and your machine will reboot. You’ll see a Windows logo, followed by a language selection – UK English should be selected. Windows 10 will then install automatically, keeping all your programs (apart from antivirus), files and settings. However, as we said at the start, it’s worth backing up anything you can’t afford to lose first.
Step 6: When you finally get to the Windows 10 desktop, allow a bit of time for Windows 10 search for drivers for your hardware. Initially on our test laptop, it seemed as though the graphics card drivers hadn’t been found and installed. However, after a few minutes this was all done in the background and the correct resolution set.
If you want to do a clean install, then scroll down to the next section.

Still, it’s worth heading to Device Manager and checking that all drivers are installed, especially for the system chipset. If you can’t find Windows 10 drivers from your motherboard manufacturer, Windows 7 or 8 drivers may work.
How to get Windows 10 now: Clean install
You can’t clean install Windows 10 without going through the upgrade process above. That’s because you don’t have an product key as you do with Windows 7 or 8, so Windows 10 needs to activate automatically online after upgrading from an elibigle copy of Windows 7 or 8.1.
When Windows 10 is activated, Microsoft can identify your PC and associate it with an activated and valid Windows 10 licence. This means you can perform a clean install (even on a different hard drive, so it’s a good time to upgrade to an SSD if you have been running Windows on a traditional hard drive) and Windows 10 will activate without issue.
To check if Windows 10 has activated after upgrading, head to Control Panel > System and Security > System and look under Windows activation:

Only if you make “significant changes” to your PC will you have to call the Microsoft activation helpline.
To do a clean install, you’ll need to return to Step 2 in the walkthough above, using the tool you downloaded to create a bootable USB drive or DVD. Once that’s done, turn off your computer, install and / or remove any hard drives and SSDs you want to swap around and then boot from your USB or DVD.
If your PC won’t boot from it, head into the BIOS settings (typically press Delete, F1 or one of the other F keys just after you turn your computer on) and make sure removable drives, or the DVD drive is set as the first boot device, and not a hard drive. We can’t be specific about the menus and settings, since each BIOS is different.
How to fix flashing screen after Windows 10 installation
It was drawn to our attention on our forums that many users are having issues with the screen flashing following the Windows 10 installation.
Fortunately it’s fixable. First, restart your computer. You can try pressing Alt-F4 and choosing restart if you can do it while the screen is blinking, but otherwise hold down the power button for up to 10 seconds until the computer turns off. Turn it on again, but instead of logging into Windows 10, click the on-screen power button and then hold the Shift key on your keyboard while clicking the Restart option.
Windows 10 won’t restart but will go to a screen with a troubleshooting option. Click this and then Advanced options. Now choose to restart and you will see options to go into Safe Mode. Any Safe Mode option will do. The PC will now start in Safe Mode.
Press the Windows key and R together to get the Run box. Now type msconfig and press Enter. Go to the Services Tab in the window that opens. Scroll down until you find two tasks that need to be stopped:
- Problem Reports and Solution Control Panel Support
- Windows Error Report Service
Disable these by unchecking them, then click Apply, Ok. Restart the computer. If that doesn’t fix it, reboot into Safe Mode again and right-click on the taskbar along the bottom of the screen. Choose Task Manager and then click on the tab for Startup programs. You can right-click on each one and disable it. This should stop the blinking screen, and you can then turn services back on in Task Manager one by one (a restart after each) to isolate which program is causing it.
How to fix black screen boot problems after Windows 10 installation
Recently in an informal conversation we had in the office about Windows, it came to our attention that some people are still having problems installing and even booting into Windows 10.
A lot of people have reported the same black screen problem, where after the upgrade process, be it on a clean install or an upgrade from an older Windows version, have been unable to boot into windows past the POST screen. The POST screen is the initial screen you see immediately after switching on a computer.
The problem often comes after a few Windows updates and is often caused by people who have a graphics card (GPU) installed in their laptop or PC. You will know if you have the problem, as when you boot the PC, you’ll also sometimes find the keyboard and mouse lose power and switch off (if you have LEDs within them) and the screen to only display a black screen or go on standby.
The issue is tied with the way Intel and Windows manage the iGPU unit found on the processor. The iGPU is the on-board graphics found on Intel chips. We have noted a few people on AMD processors to also share the same problem, but have found the majority of complaints come from Intel users.
The solution is to fully disable iGPU from Windows. There are two solutions to this, depending on how far you’ve progressed with your Windows 10 installation:
How to fix black screen boot problems: How to prevent the black screen problem after Windows 10 installation
Note: You will not have the option nor should disable the iGPU if it’s your only display output.
Here are the following steps summarised:
- Ensure your graphics card drivers are installed
- Enter Device Manager
- Disable iGPU through Device Manager
- Reboot your PC and enjoy Windows 10
If you’re in Windows 10 and can see the desktop, the solution is to disable the iGPU drivers from the Device Manager. Before doing so, you have to ensure you install the Nvidia or AMD graphics card drivers, but to remember not to reboot after the installation is complete.
In order to access the Device Manager, navigate to the start button and type ‘Device Manager’. This will present you with the Device Manager. If for any reason Windows does not index properly, you will find Device Manager under the control panel. To access this, type ‘Control Panel’ in the search bar and once it’s open, search ‘Device Manager’ within the control panel’s window.

Within the Device Manager, double click on ‘Display adapters’ to present the graphics adapters. Here you should see your iGPU, usually denoted by ‘Intel(R) HD Graphics xx00’. Right click on the ‘Intel(R) HD Graphics xx00’ adapter and disable it. Once complete, restart your PC and you shouldn’t encounter the black screen problem.
How to fix black screen boot problems: The black screen problem after restarting your PC
Note: If you do not have the option within your BIOS, this step will not apply to you. A lot of laptops lack the option of disabling the iGPU or switching the graphics card as the primary display output.
This step mainly applies to those that are on desktop PCs and have a graphics card installed. People who have experienced this problem have found that the PC does go past the POST screen when the iGPU is the primary display output. This might seem like an easy fix, however, this makes Windows not fully utilise your graphics card and puts unneeded stress on your CPU.
Here are the following steps summarised:
- Connect your monitor directly to your motherboard and your graphics card (you might need a secondary monitor to do this)
- Make iGPU your primary output through the BIOS
- Boot into Windows, ensure your graphics card drivers are installed
- Disable iGPU through Device Manager
- Reboot the PC and enter your BIOS
- Make your graphics card the primary output by selecting PCIE as your display output
- Optional: Disable iGPU Render Standby to completely disable your iGPU
- Reboot your PC and enjoy Windows 10
In order to get out of the black screen problem and solve it, you have to enter your computer’s BIOS. This is done when first switching on the computer, where you will need to press either the ‘Delete / Del’, ‘TAB’, ‘F12’, ‘F8’ or even a combination of ‘Fn+F2’ keys. The key to enter the BIOS differs on different computers, especially those that run pre-built computers such as Dell Computers. However, generally speaking the key to enter your BIOS is the ‘Delete / Del’ key.
Note: The BIOS or UEFI BIOS might look different from the below screenshots, depending on your motherboard’s manufacturer.

Once in your BIOS, search within the advanced menu for the primary display output. The name can vary from different motherboard manufacturers; however you should be presented with an option that lists: ‘Auto / PCIE / iGPU’. Often on Auto mode, it will select the PCIE, which in this case is the graphics card, as it is a dedicated card for video output. The PCIE name denotes the slot on your motherboard, which is where the graphics card sits.

You will first have to make iGPU your primary display. Select ‘iGPU’ in the list then exit the BIOS and make sure you ‘Save and Exit with Changes’.
Important: You will need to make sure your monitor is connected directly to your motherboard and not your graphics card.
Once you’ve rebooted into windows, ensure your graphics card drivers are installed then proceed to disable iGPU through device manager (see a full guide above in the section titled: ‘If you have yet to restart your PC after the Windows 10 installation’).

Reboot your PC and enter the BIOS again. This time, you’ll want to select the primary output display as PCIE. As an additional extra you could also disable iGPU Render Standby to fully disable iGPU from being used.
Exit the BIOS, again making sure you ‘Save and Exit with Changes’, and you should be able to use your graphics card as your primary display, without having to worry about any black screen.
Important: Do remember that when you exit the BIOS on the second occasion, after you’ve selected PCIE as the primary output, you will need to connect your monitor back up to your graphics card and not your motherboard (iGPU).
Hopefully that should solve all your black screen boot problems and enable you to fully enjoy Windows 10 without worrying about it not being able to get past the POST screen.
[Source:- PC advisor]


