
Much has changed in the past month. We’ve seen an emergency cry for all Windows XP, Vista, Win7, Server 2003, 2008 and 2008 R2 systems to get patched in order to fend off widely anticipated BlueKeep attacks. We’ve also seen Microsoft officially release Windows 10 version 1903, with unsuspecting “seekers” now the prime targets.
If you want to avoid the mayhem that seems to accompany every month’s dump of partially-tested patches, it would behoove you to turn off Windows automatic update and wait to see what squishy stuff gets stuck in others’ shoes.
You’ll have to install the June 2019 patches at some point. But for now, discretion’s demonstrably the better part of valor.
Contents
Blocking automatic update on Win7 and 8.1
If you haven’t recently patched Windows XP, Vista, Win7, Server 2003, 2008, or 2008 R2 systems, drop everything and get patched now. Once you’ve installed the BlueKeep patches, come back here and turn automatic update off. (No need to bother with XP and Vista; they aren’t getting automatically updated anyway.)
If you’re using Windows 7 or 8.1, click Start > Control Panel > System and Security. Under Windows Update, click the “Turn automatic updating on or off” link. Click the “Change Settings” link on the left. Verify that you have Important Updates set to “Never check for updates (not recommended)” and click OK.
Blocking automatic update on Win10 Pro
If you’re using Win10 Pro version 1709, 1803, or 1809 I suggest an update blocking technique that Microsoft recommends for “Broad Release” in its obscure -Build deployment rings for Windows 10 updates – which is intended for admins, but applies to you, too. (Thx, @zero2dash)
Step 1. Using an administrative account, click Start > Settings > Update & Security.
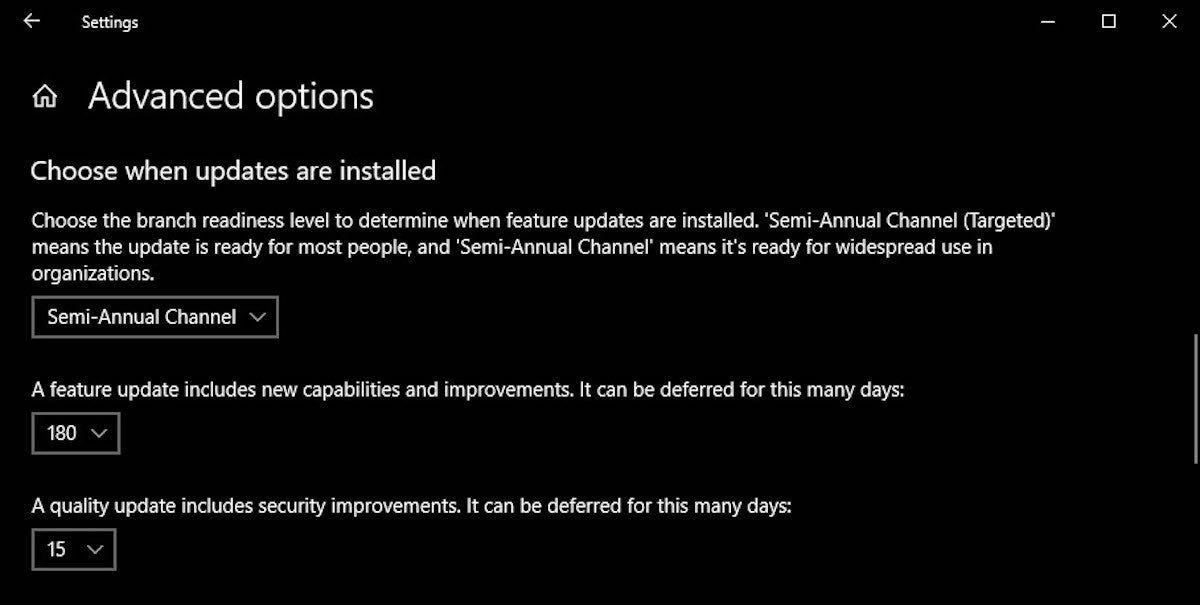
Step 2. On the left, choose Windows Update. On the right, click the link for Advanced options. If you’re using Win10 version 1803 or 1809, you see the settings in the screenshot.
 Microsoft
Step 3. To pull yourself out of beta testing (or, as Microsoft would say, to delay new versions until they’re “for broad deployment”), in the first box, choose Semi-Annual Channel.
Microsoft has declared that its old terminology is no longer in effect, then later declared that Win10 version 1809 is Semi-Annual Channel, using the old terminology, and thus ready for widespread deployment. You don’t have to agree – you get to choose whether to stay with 1803 or move to 1809. Even though I’ve upgraded my production machines to 1809, I can certainly understand if you don’t want to.
Step 4. To further delay new versions until they’ve been minimally tested, set the “feature update” deferral setting to 180 days or more. That tells the Windows Updater (unless Microsoft makes another “mistake,” as it has numerous times in the past) that it should wait until 240 days after a new version is released (60 days for Semi-Annual Channel + 180 days deferral) before upgrading and re-installing Windows on your machine.
Win10 version 1809 was nominally released on Nov. 11, 2018. Add 240 days and you get July 11, 2019. So if you’re running 1803 update on Semi-Annual Channel, and you set the “feature update” deferral to 180 days, you won’t be forcibly upgraded to 1809 until July 11, at the earliest.
Step 5. To delay cumulative updates, set the “quality update” deferral to 15 days or so. (“Quality update” = cumulative update = bug fix.) In my experience, Microsoft usually yanks bad Win10 cumulative updates within a couple of weeks of their initial release. By setting this to 10 or 15 or 20 days, Win10 will update itself after the major screams of pain have subsided and (with some luck) the bad cumulative updates have been pulled or re-issued. Notably, in February 2019, it took Microsoft 18 days to fix its first-Tuesday bugs.
Step 6. Just “X” out of the settings pane. You don’t need to explicitly save anything.
Step 7. Don’t click Check for updates. Ever.
If there are any real howlers – months where the cumulative updates were irretrievably bad, and never got any better, as they were in July 2018 – we’ll let you know, loud and clear.
Tired old approach for Windows 10 Home
If you have Win10 Home, version 1803 or 1809, your only reasonable option is to set your internet connection to “metered.” Metered connections are an update-blocking kludge that seems to work to fend off cumulative updates, but as best I can tell still doesn’t have Microsoft’s official endorsement as a cumulative update prophylactic.
To set your Ethernet connection as metered: Click Start > Settings > Network & Internet. On the left, choose Ethernet. On the right, click on your Ethernet connection. Then move the slider for Metered connection to On.
To set your Wi-Fi connection as metered: Click Start > Settings > Network & Internet. On the left, choose Wi-Fi. On the right, click on your Wi-Fi connection. Move the slider for Metered connection to On.
If you set your internet connection to metered, you need to watch closely as the month unfolds, and judge when it’s safe to let the demons in the door. At that point, turn “metered” off, and just let your machine update itself. Don’t click Check for updates.
Special note for Windows 10 version 1903
Couldn’t resist the temptation, eh?
If you’ve already jumped ahead to Win10 version 1903, you’re entering uncharted territory. We’ve heard lots of promises about the new updating regimen, but haven’t been through enough update cycles to know exactly what’s going to happen.
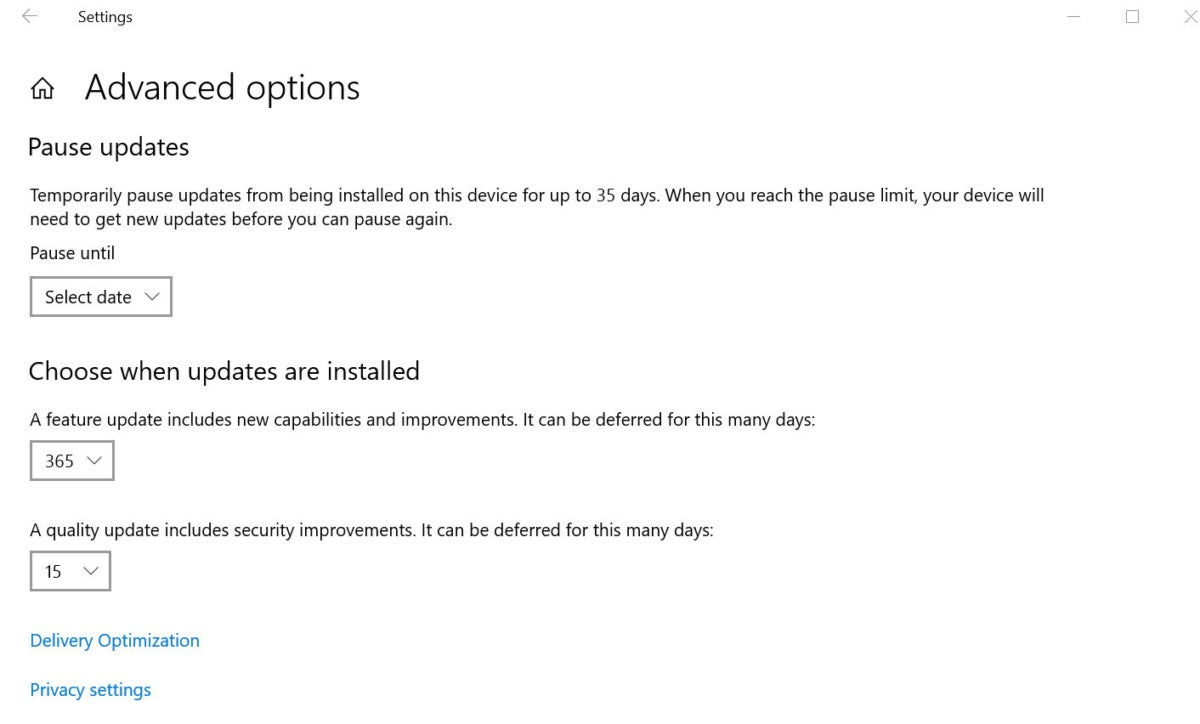
If you’re running Win10 1903 Pro, my advice is that you NOT click Pause updates on the main Windows Update page. Instead, click on Advanced Options and (as shown in the screenshot) choose to defer feature updates by 365 days and defer quality updates for 15 days.
 Microsoft
If you’re using Win10 1903 Home, we still don’t have enough experience – or reliable documentation – to say for sure what’ll happen. But it seems to be a good idea to both set your connection to metered, as discussed in the preceding section, and to click Pause updates twice – for a total of 14 paused days. Historically, that’s been sufficient to avoid the worst problems.
[“source=computerworld”]


